November 19, 2011

LED tail lights

When I designed my LED brake lights, I took the Lumens output of a sylvania 1157 bulb 

http://www.sylvania.com/ConsumerProducts/AutomotiveLighting/SignalAndBrakeLights/Signal+and+Brake+Products/ 

260-500 Lumens 

I used the calculator: http://led.linear1.org/lumen.wiz 

I've tried several LED's. The are continually getting better. 

1. http://www.ebay.com/itm/200pcs-High-Power-0-5W-5-chips-5mm-Red-LED-Lamp-80Kmcd-/370373792748?pt=LH_DefaultDomain_0&hash=item563bff93ec#ht_3561wt_1396 

These are 80,000 millicandella (mcd) at 40 degrees. The calculator gives me 30 Lumens. I want 1000 lumens which is the max output of 2 sylvania bulbs. 

I need 33 LEDs on each board. 

2. If I were buying more and redoing it today I'd use these: 
http://www.ebay.com/itm/10p-0-5W-5-Chips-8mm-StrawHat-Red-LED-Light-100-000mcd-/350347186105?pt=LH_DefaultDomain_0&hash=item519251cfb9#ht_3702wt_1396 

These are incredible. 95,000 mcd at 140 degrees. When you run it through the lumen calculator you see 392 lumens. That is in the range of standard bulb!! If you put 2 or 3 of these ones you'd be much much brighter than a standard bulb.


When you get bigger with the LED's you use a few things become very important. You need to protect the LED's from voltage spikes caused by the starter,etc. The LED's can last a long time if you take care of them. They will degrade quite a bit if you have too much/too little Current or voltage. 

National Semiconductor launched a Automotive LED design center on it's website: 

http://www.national.com/en/led/automotive_lighting.html 

If you really want to geek out on it, you can watch the videos that national put together. There is some really good info relating current, voltage, temperature, etc. 
http://www.national.com/en/automotive/videos.html 

The intro ones videos have some good basic stuff and really go into the explanations: 
http://videos.national.com/national/2009/intro_hb_led/index.html 

Their is a good video where they compare the types of drivers. The bottom line is you need one or your LED's will be worthless quickly. 

The 2002s.net design is done quite well. They take all this into consideration and deliver a really good solution. Once you start to look at what is involved in putting together a solution that is reliable you'll see why theirs is expensive. 

Personally I want there to be a solution that separates the different parts. 

1. LED's - this is easy, you can pick them up all day on ebay 
2. Driver - I think there should be a driver that regulates and protects the LED's. Also I'd like to use both the driving light and stop light at all times. The night time driving lights should be dimmed. The best way to dim is PWM. http://en.wikipedia.org/wiki/Pulse-width_modulation 

Here is a project that builds a driver specifically for this reason 

http://www.hidplanet.com/forums/showthread.php?40783-FS-Mini-Opti-Drive-PWM&highlight=opti-drive

August 21, 2011

Throttle Bodies


When selecting a throttle body, there are a number of considerations. You need it to flow enough to support your engine's horsepower.  Generally, you want to take the throttle body from an engine that made similar horsepower to your engine.


However, there are some drawbacks to a too large throttle body:


At low rpm, you go from low kPa to 100kPa with very little throttle movement, making driveability 'worse'. For example, with a very large throttle body you may get 100 kPa at 20% throttle at 2000 rpm. This means if you want to hold it at 40 kPa for cruise, you have to be very steady on the throttle, as small movements may produce large changes in engine output (so it's harder to be smooth), and
A small throttle movement (and a small V/sec TPS signal change) can result in a very large change in MAP (as mentioned above) at low rpms. The result is little (or no) accel enrich when the engine needs it most. However, you can usually tune around circumstances like this by richening the VE table at low rpms and higher kPa (say < 2500 rpm and> 70 kPa) by about 5-7%. This has a negligible affect on fuel economy, since you likely never see 70 kPa while cruising.


To calculate how much horsepower you can make from a given throttle body size, you can use the estimator in the megamanual.  http://www.megamanual.com/v22manual/minj.htm#throttle
BMW throttle bodies are made differently than any other throttle body I've seen.  Instead of having the butterfly actuated directly, BMW has a progressive opening butterfly using a 3 bar linkage.


3 common throttle bodies you find in US junkyards are from e30's


1 - 318i throttle body


2. 325e throttle body


3. 325i throttle body.


These all measured with a .001 accurate dial caliper.

First dimension is the air inlet Inside diameter

318i - 52mm
325e - 55mm
325is - 64mm

Butterfly diameter - I actually took each one out of the throttle body for this

318i - 45mm
325e - 51mm
325is - 58mm

Outlet - This is the part that goes to the engine
318i - hard to read because it turns into an oval - 50mm in the small length
325e - 53mm (yes 2mm less than inlet)
325is - 63mm (yes 1mm less than inlet.. I triple checked)


Since the butterfly is the important part I calculated the estimated horsepower for each throttle body in the megamanual estimator.

318i - 116Hp
325e - 150Hp
325is - 193Hp

August 2, 2011

Fuel Lines.


I struggled with fuel lines a bit.  My car is a 68 which didn't come with any metal lines.  The later ones had one metal and one plastic line.  10 years ago, I was afraid my plastic line was leaking.  I had a car rated fuel pump in the trunk, so there was 4-6psi in the plastic line.  Those plastic lines are rated to 3psi.  So I went to napa and picked up 2 6 foot sections of 5/16 brake line.  5/16 is pretty much 8mm which is what the stock fuel hose is.  With a bender from harbor freight and jack stands I was able to bend a line that went from the trunk along the driveline just past the center bearing.  I choose the driveline tunnel because I've seen fuel lines pinched by lifting the car at the factory jack points.  I don't recall it being a big deal at all.  A Saturday afternoon project when I had to drive the car the next day.  I used the standard tubing flare tool to put a small bubble to hold the rubber fuel line in place.

For the fuel injection project, I needed 2 lines.  After researching, I found aluminum isn't rated to fuel injection pressure. I called classic tube, but they wouldn't give me any technical info on their line.  It was much more expensive.  Since I couldn't find the material, thickness, and routing I gave up on them.  I went to summit racing and picked up their  25 foot galvanized double walled 5/16 hard line.  I figured that would be enough for 2 lines.  So I cut it in half and started bending.  I immediately broke my harbor freight bender.  I tried adding heat and  bought 2 more different benders which I also broke.  I finally found the only way to bend the line was with a 5/16 only refrigeration bender.  As I got close to the front, I realized the 12.5 foot length was 2 feet too short.  So I ordered 2 more rolls of the Summit hard line.  I finally go them into place, which much hard work, but there was a couple of pinches in the material and the routing wasn't as clean as I'd like.

I was looking at brake lines a while ago and found a place called inline tube.  I mention my fuel line to the guy and he told me to go measure it.  It turns out Summit sold me aircraft grade tubing that was much thicker in the wall than I should have.  He told me there was no way that could have been bend without a CNC bender.  I purchased some tube from them to replace the first installation.  Instead of being shipped in a tight roll, inline tube sells it with "shipping bends".  This made it much easier to straighten out.  The tubing was much easier to bend and form.  Inlinetube.com sells the good bender I ended up buying elsewhere.  To top it off, inline tube is half the price of the summit tubing, of which I wasted 3 25 foot rolls.

The moral of the story is if I had gone to inline tube first, I would have saved myself much work, stress and money.  They are very helpful and would recommend them to everyone.

This is a diagram of how I routed the lines.


In order to hold down the lines I used Kugel Components #6513701 5/16" x 5/16" Double clamp.


July 11, 2011

High voltage tach adapter

In order to get the tach to work I used the diagram found in the megamanual.  I didn't like the way the relay coil was used. Instead I sourced a Digi-Key M10125-ND fixed inductor in series with a 470 ohm resistor to replace the relay coil. 

Replacing EDIS with LS2 coils on a Megasquirt2 (ms2extra)

The MS2 can be configured for either sequential spark or wasted spark with 4 LS2 yukon coils.  Sequential spark requires a cam sensor.  My advice is to  first configure wasted spark with ls2 coils.

Parts needed

4- ls2 yukon coils (d585)
4- spark plug wires the MSD are easy and plentiful
4 - resistor spark plugs - I use BPR6es NGK's
1 - bracket (make your own or Tom from 02again)
1 - GM wiring harness
1 - connector metri-pack 150 8 pin female
1 - Crank sensor (I like the hamlin 55075 hall sensor)
1 - crank trigger wheel from tom at 02again

Wiring - You can have a couple options, either buy individual coil wires and wire yourself or get the GM harness.  If you look on ebay you should be able to find many coils from silverado trucks.  I recently purchased a set of coils that included 8 d585, 2 GM brackets and 2 GM wiring harness for $50 shipped.  I prefer using the GM wiring harness because it gives you a single point to unplug the coils.  This was very handy when my alternator light backfed the Megasquirt ECU and allowed the engine to run with the ignition off.  (PS, everyone should put a diode on their alternator pin)

You can find an appropriate coil setup by searched junk yards or ebay for the coils from:
2000-2008 Chev. Silverado, suburban, tahoe, yukon, envoy, savana or Sierra.

Look for the aluminum heat sinc next to the connector.  Don't buy any coils that don't have it.

All the connectors are Delphi Metri-pack connectors.  You can buy them in components or as pig-tails on ebay, mouser, digikey, etc.  You may need to ask specifically for the 8-pin connector to the stock harness.
http://connectors.delphi.com/DCSGDMCS/DCS/Catalog/PartDetail.aspx?vUser=GuestUser&vFlag=P&vList=Y&vExact=0&txtPartNum=12047938
If you put together your own connector you need the following delphi part numbers
Qnty 1 - 12047938    - Delphi Metri-pack 150 8-pin female
Qnty 7 - 12048074  - metri-pack 150 Female terminal - 18/16 gauge (I'd get at least one extra)
Qnty 1 - 12066304  - Metri-pack 150 TPA lock - 8 way
Qnty 7 - 15324973   - Red Metripack 150 connector Seal (14-18 GXL wire)


Connecting up the wiring

The MS2 is capable of 2 or 4 logic signals to drive coils.  Unfortunately the MS2 software currently doesn't allow you to wire for 4 and drive a wasted coil over plug configuration.  You will need to wire 4 coils into 2 outputs from MS2.

You need to get the signal first out of the MS2 case by using unused pins in your harness.  Inside the MS2 on the v3.0 board you use d14 as spark A and d16 as spark B.  On v3.57 spark A is right of R26 and spark B is bottom of R27.

http://msextra.com/doc/ms2extra/MS2-Extra_Ignition.htm

Note: if you aren't comfortable with modifying the inside of your ms2, get an MS3 as all these outputs are much easier.  Also you can wire for 4 coils and use a wasted spark configuration.

Connections to the coils.

At this point you have 2 outputs from MS2 and 4 coils.  Each coil has 4 connections.  Power (draws up to 15 amps for 4 coils), engine ground, signal (from MS) and signal ground.

http://msextra.com/doc/ms3/ignition.html#ignout

If you are wiring for wasted spark connect the signal such that: SpkA = cyl1&4, SpkB = cyl3&2

June 22, 2011

Rust identification

I need to decide how to handle the spots of rust.  I'm lucky there are only a few spots on the nose and the spare tire well.  Additionally a few pin holes.

Rust on the bottom lip of the nose

Spare tire well #1

Spare Tire well #2

Spare tire well #3

below the rear seat


June 1, 2011

In preparation for restoration

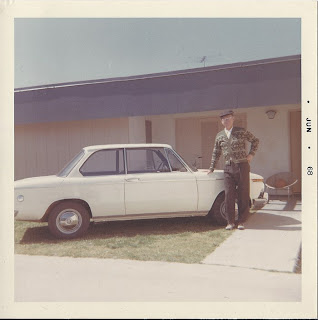
In preparation for restoration, I dug up some old photos.  The first photo was taking when my 1600 was new.  The caption on the back is {The "sport"}.  


I went to visit my Granny and Pa in 1996.  Granny remember they still had the same sweater and hat.  I had to get a photo of that.  Same town, same car, same sweater and hat.